Pages

Tuesday, 30 June 2015

Beans in the Garden: 2015 Varieties


I recently posted about planting borlotti beans as part of the three sisters garden I have; now for the rest of the beans.  I've never grown this many varieties (six!) or quantity of beans before, so I'm quite excited.  But the quantity certainly brings its challenges - especially with management of pests and critters that like to nibble!

I started with this patch (shown above) which was planted May 13th.  I have always direct sown my beans, as I’ve done with all of the varieties I have this year.  I don’t even soak them – just pop them in the ground and then water them in - it has just always worked for me in the past and it seems to have worked well enough this year again.  The plants were already a few inches tall when the frost/freeze hit on May 23rd.  I had covered them with plastic and weighed the plastic down with all sorts of gear from around the yard as there were also high winds.  The majority survived.  Where they were damaged, I removed the plant and reseeded.  The three varieties in this garden are of the bush variety and are all new to me this year …
 

The first two rows on the left are black turtle beans.  I’ve come to love borlotti beans just in the past few years, but I’ve always been a huge fan of black beans, so I’m excited to be growing my own for the first time.  These came from Greta’s Organic Seeds, a local company not far from where I live.  Black turtle beans can be vining or bush.  Although they take more garden space, I find bush beans easier to grow.  


These require a lengthy season – 100-140 days to harvest.  Having them in the ground in early May gives me to about the end of September for harvesting.  Just enough time, as we often experience frosts early in October.


The next two rows (so the middle two) are Royal Burgundy bush beans from William Dam Seeds.  


Compared to the long season required for the black beans (and similarly, most drying beans) these have only 50 days or so to harvest.  I can already see the dark purplish pods starting to develop.  


These ones have some nibbles on the leaf but not too bad and its only on a few leaves.


And the last two rows on the right are Delinel – again, from William Dam.  Their website states, “Delinel is consistently the earliest variety in our trials. Excellent taste and holding quality”.  I’m looking forward to trying these! 


Although their harvest time is slightly shorter than Royal Burgundy at 45 days, they seem a bit further behind.  Or maybe it's just that their flowers are lighter in colour and not as obvious.


The remaining two bean varieties I have in the ground are vining / pole style.  I finally put together a trellis structure (my first ever!).  It did not take much time (which probably is evident in its lopsided-ness).  But I still seem to be challenged by getting beans (and peas) to climb up stuff.  I’ve got twine hanging down and keep hanging it over the plants hoping they’ll catch on to it – not so much yet (plus the twine keeps getting twisted up every time there is a wind).  Ugh, I think I’ll stick with bush beans in the future.


My other challenge is that they keep getting eaten … this garden space is right beside several acres of trees so I imagine there are all sorts of critters coming out of the bushes.  I’ve replanted and they seem to be okay for now, but I lost a lot of beans last year here as well – I guess I should take the hint and move them somewhere else next year!
Anyway, in the area with the trellis, I have Scarlet Runner (grown last year in the three sisters garden which means I didn’t get any at all) and Tarbais - a white bean that I successfully grew last year.  Although I was successful with the Tarbais, there was one mishap.  I mistakenly thought they were fresh beans early in the season (I was also growing Isabel pole beans) and harvested many of them for pickling.  Turns out they were fine to eat at that time (although a bit tougher than a fresh bean might have been), but I obviously had a much smaller harvest for drying at the end of the year.  When planting these out, I still had some Isabel beans left from previous years, but decided against planting any to avoid that problem – I’m unable to properly keep track of where I plant things so best to keep it simple.

And that’s it for my bean round-up. 


Monday, 29 June 2015

Harvest Monday: June 29, 2015


This is my submission for Daphne's Dandelions Harvest Monday collection.   I've got some of the same, some new.

The photo is a recent harvest of Batavian endive ... a.k.a. escarole.  It's not mature yet, I'm just thinning out the rows.  This batch was sauteed with mushrooms for a yummy pasta.


The rest of the week's harvest is more of the same ... I've pulled all of the Music garlic because of the leek moth infestation.  I have left the Red Russian garlic in for now.  There is a teeny weeny strawberry amongst the peas in the picture below. 


And some more peas, a bit of kale, basil, lettuce greens and a few radish.  Busy days now, will catch up on other stuff when I can.  Looking forward to seeing what others have on the go.


Friday, 26 June 2015

Three Sisters Garden: Redux


I tried this concept last year for the first time and it was a miserable failure.  But I believe it was more about the cool weather and the location rather than the particular combination of vegetable plants being grown together.  In fact, I’m having a difficult time with that location even this year so I’m not taking that failed attempt too personally.

Lettuce, kale and beets planted in April (very little to be seen!)
 
Especially considering how pleased I am with this year’s progress so far.  This is probably my most advanced garden space in the yard (although with all of the rain and sunshine the past few weeks, many of my plants are looking pretty nice right now).


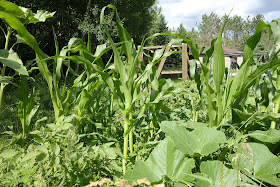
I planted golden bantam corn – this is the same corn I tried last year as I had some left.  I had also ordered another packet of corn (Paydirt from Vesey’s) new for this year but decided I didn’t have the space.  Because of the poor growth I had in 2014, I actually started the corn indoors (April 26 seeded) and transplanted it once the weather warmed up (I can't remember when).  


I noticed earlier last week that some of the corn was falling over – I assume it was due to the high winds we’ve had recently.  But I also had considered that possibly the squash wrapping around it might be pulling it over??    I straightened them up a bit and put more soil around the base and they seem to be standing better now.

And these here are the two Marina Di Chioggia squash plants that I purchased at a plant sale back in the spring.  These were in the ground early (around May 19th?) and survived the frost/freeze just a few days later as I had covered them with upside-down pots.  So they have a really good start on the growing season.


I also have several winter squash plants – and that’s all I can remember about them.  I’m pretty sure they are acorn or spaghetti squash but I can’t remember and don’t know enough about the leaves to guess at this point.  I have winter squash in various locations this year so I’ll just figure it out when they start to grow.


As for the third sister – beans – these are borlotti.  Definitely one of my favourite beans.  I also have beans in a few other spaces which I’ll post about separately.  Although I’ve put the three sisters (corn, squash, beans) into the same garden space, I can’t really call this a proper three sisters garden.  The intent of that garden style is for the plants to mingle and benefit from each other’s growth – for example, the beans are often pole bean style and would use the corn stalks as their support to grow vertically.  Because these beans are off to one side, I’m not really getting the benefit of planting them together.  


Borlotti are actually a bush bean, so the support is not necessary.  Mind you, they do get quite tall and I sometimes stake one or two of the plants if needed (this is only my 3rd year growing borlotti so still working out the best approach).  


Sometimes a fourth sister is included in the mix as I’ve done here – the sunflower.  These are Kong sunflowers and are intended to get up to 12-14 feet tall.  I have also scattered these around the property but these two are definitely the best specimens so far – quite a bit thicker and taller than the others I have planted (they were started in the greenhouse).


And I have a fifth sister – OK, now I’m just making stuff up, this is definitely not traditional!  But I do have a fifth crop here – volunteer potatoes.  This area was my potato patch last year and I rotate crops regularly to reduce pest infestation (in this case, the Colorado potato beetle).  I pulled out the volunteers (well, most of them) where they came up near the corn or squash, but I figured they would be okay coming up around the beans.

I’m keeping a close eye out for problems (and a little bit of finger-crossing) as it is still early days.  But results so far are promising! 

Thursday, 25 June 2015

Steel Cut Oats and Basil Pesto "Risotto"


Risotto is traditionally a rice dish.  But it seems in the modern culinary world, it has become more of a style of cooking - liquid or broth slowly absorbed by some form of grain to create a creamy texture.  As much as I love the use of the common arborio rice, I've also enjoyed risotto made with barley - seems a bit healthier to me (I've listed some of my other risotto recipes at the end of this post).

Since my recent introduction to the world of "overnight oatmeal", I now have a huge bag of steel cut oats.  I thought I ought to come up with other uses for it.  Hence, this trial recipe using steel cut oats to make a "risotto".  Result: awesome!  It reminds me of a non-asian version of congee.

And I am now already harvesting lots of fresh basil from the garden and still have a couple of jars of pesto in the freezer from last year.  This seemed like a good opportunity to use it up!

Ingredients:
1 shallot, minced
2 garlic cloves, minced
3/4 cup steel cut oats
1/2 cup white wine
3-4 cups of veggie broth, warmed on stove
3 Tbsp basil pesto* (homemade or store-purchased)
2 oz goat cheese

Saute the shallot and garlic in a saute pan with 1 Tbsp olive oil.  When softened, add in the oats and stir about 1-2 minutes to coat.  Add the wine, stir and cook about 2 minutes to release some of the alcohol from the wine and start the oats absorbing liquid.

On medium-low heat, add 1/2 cup of veggie broth at a time - stir to mix, then let sit while the liquid is absorbed.   After 1 cup has been added, stir in the basil pesto and goat cheese.  Continue adding the broth until the oats are tender and creamy.  Note: it will likely be a creamy texture before fully cooked so will continue to absorb the liquid - that means leftovers might get a bit stiff so just reheat with extra liquid.


* This recipe is simple and you can add any flavours you want including various types of pesto, or leave off the pesto and just add some veggies. So many options!  And here are some others for consideration which can alternately be made with regular arborio rice, barley or steel cut oats:

Avocado Barley Risotto

Beetroot Risotto

Butternut Squash Risotto

Mushroom Barley Risotto


Monday, 22 June 2015

Harvest Monday: June 22, 2015


One of the many benefits I get from participating in Daphne's Dandelions Harvest Monday collection is the documented history of my harvests.  I was reviewing last year's to see what I had going on this same time.  Although I'm far advanced with crops that have a longer time to harvest (e.g. winter squash), I am actually behind with many of the more spring-like crops - greens, that is.

Last year at this time, I was already harvesting beet greens and swiss chard; both of which are barely a glimmer in my garden right now.  And it's all because I decided to test the "plant when the ground can be worked" theory.  Now the theory itself isn't necessarily to blame - I'm pretty sure it's just the area where I did this test ... last year's "3 sisters garden" which itself was a disaster.

The swiss chard I planted back in mid-April has barely sprouted!  I've since planted some more but not soon enough for me to enjoy any for at least another couple of weeks.


And here is the curly kale I planted in April (barely visible) ... compared to some I planted only a couple of weeks ago!


April planting of curly kale


So the area is obviously not suitable for whatever reason.  Well, plants are growing, just VERY slowly.   Anyway, enough complaining about what isn't growing ... let's talk about what is growing and getting harvested!

In the main photo above, you see that I've pulled some of my garlic already (and the few scapes that survived) - this is because of the leek moth infestation.  I'm going to pull most of the garlic early so I was just testing how far along it was (I hope I can make it another few weeks without losing all of it).  I also had some radishes and just a wee bit of kale and spinach.

And I've finally had a good harvest of lettuce to keep me in salads for a few days.


And finally ... my first handful of peas!  And that's it for this week.


Sunday, 21 June 2015

Grantham Gingerbread Biscuits - A Father's Day Guest Post from Dad


I call this a "guest post" although it's still me writing - it's my dad who did the baking, took the photos and gave me the details.  It all started with my aunt Carolyn (dad's sister) giving me a challenge ... to make a batch of our namesake cookies. Here's a brief history of this delicious gem from the town of Grantham, England (Wikipedia):

The town is known for Gingerbread biscuits which were first made in 1740 by William Eggleston. Eggleston, a baker by trade, was a producer of a biscuit called Grantham Whetstones. Whetsones were a rusk like dry biscuit enjoyed locally and also by coach drivers who used to stop in Grantham to change their horses whilst travelling on the Great North road. According to folklore, Egglestone, whilst baking whetsones' in his dimly lit kitchen one morning, mistook one ingredient for another, resulting in a ginger like biscuit to emerge from the oven. The mistake was a huge success and the biscuit became established as Grantham Gingerbread.

Grantham Gingerbread is known as a white gingerbread because it is not made with molasses or black treacle. Because of this is it has a delicate gingery flavour, rich in butter with a domed shaped top that has a crackled surface. The centre of a Grantham Gingerbread biscuit is hollow and resembles a honeycombe appearance.

____________________________________________________________________________

After a lengthy review of many, many recipes I came up with a recipe that seemed to combine the best of them all.  I failed miserably.  I actually had a picture of my failure at one point, but I can't seem to locate it.  It was a picture of the baked cookies almost as one big cookie - they had spread out to the point that they were one big mess! So I asked my dad to give it a go.  And here is how it all came down ...


He started with this recipe which I've replicated below - BUT, there was a big problem with one of the ingredients!  So he fixed that and made a few other modifications.

I'll start with the problem.  The ingredients call for 250 grams of self raising flour (being in North America, I often have to be reminded how to convert this ... the common advice is to add 2 tsp baking powder for each cup of flour).  The conversion noted in brackets in the original recipe is totally wrong - 250 grams is about 1 cup, not two cups!  So he used 2 cups flour (plus 2 tsp baking powder so kind of a combination of the two).


And he clearly used fresh ginger (a nice touch!).


For those that don't keep caster sugar on hand, a great tip from dad is to take regular sugar and give it a whiz in a (clean) coffee grinder.  Caster sugar is really just a superfine texture of regular sugar (sometimes called fruit sugar).


So aside from the adjustments, here's the original recipe.  My version spread too much and didn't look right, but they were DELICIOUS!


Ingredients

250 g (9 oz or 2 cups) self raising flour  
1½ tsp ground ginger
115 g (4 oz or 1/2 cup) butter or baking margarine (softened)  
340 g (12 oz or 1 2/3 cups) caster sugar  
1 egg, lightly beaten


Grantham Gingerbread Recipe

Preheat the oven to 300°.  
Sift flour into a bowl and set aside.
In a large bowl cream the butter and sugar together.
Add the egg to the butter-sugar mix about a third at a time, mixing in well.  Grate in fresh ginger (or add ground ginger to the flour).
Add the flour to the rest of the mix a bit at a time.  Stir in.  The mixture will get quite stiff.
Roll dough into balls about the size of a walnut (two tablespoons) and place on baking sheet.
Bake in the centre of the oven for 40-45 minutes.  Cookies will naturally flatten during baking.

Saturday, 20 June 2015

Mowing the Lawn: Options??


Have you read this joke about lawn care?  Pretty funny when you think about all the effort people put into keeping their lawns pristine.  The one line that sticks out for me is when God is confused by the absurdity (in reference to "suburbanites" and their obsession with lawns), "They fertilize grass so it will grow. And when it does grow, they cut it off?!".


Since 2004, I've gone from a 2 acre property, to part owner of a 49 acre farm and now owner of a six acre property (about 3 acres of which are pine forest, then the gardens; the rest being something else like "lawn").  As a residential property owner, this is on the large side of lawn to mow.  And for the 1st and 3rd properties, the previous owners were pretty particular about their lawn (manicured to the hilt) which always left me with a guilt trip about my lack of interest in mowing the lawn (and all the weeds that I seem to cultivate).


After years of mowing by foot (thankfully with a "self propelled" style of mower versus a full push mower), I finally purchased a "rider" this past fall.  I had a number of reasons for not choosing to purchase a rider mower in the past:
  1. The price of the mower
  2. My lack of mechanical ability to take care of it
  3. The extra use of gas (both cost and environment)
  4. I have a desk job so I liked the exercise (or so I like to say)
  5. Did I mention the price?
  6.  Will people think I'm pretentious?
  7. Does it make me seem lazy (see #4)?


Usually it would take me 4-5 hours over a week to mow 2 plus acres of "lawn"; some of it was the finicky bits but mostly just sheer size.  It would also consume many hours each week of anxiety thinking of the upcoming effort and trying to work it into my schedule (I work full time).  Or worse, the extreme anxiety every time it rained and I would have to figure out how long it would take to dry out so I could mow again.  And praying for hot weather so the lawn would just die and get it over with each summer.


Regarding #2 above, I will not bore you with the story of buying a used tractor style mower from a local business only to sell it back many hundreds of dollars out of pocket just weeks later.   But (and only as an aside) I will say that I'm thrilled with last October's purchase of a Toro Zero Turn mower.
I now have very little effort in mowing the lawn and I almost enjoy it now (I'm sure if I were a beer drinking guy, I would really enjoy it, but not so the case).  But that's not the point of this post ... what I'd like to know is if anyone has been successful in a non grass lawn.  I have moss here and there but can't see fully establishing a moss "lawn" as I get too much sun.


I love the idea of "landscaping without grass" and would be interested if anyone has done anything on either a small scale or large scale.  I'm sure I could sell this new mower to someone if I could find a good alternative to the lawn ... a shame that it would probably affect property value (not enough people into this kind of thing) but I'm not planning to go anywhere any time soon.

If you have ever seen or created your own "landscaping without grass", I'd be interested in hearing about it.