Sunday, 31 March 2013

Venison Sausage on Bun


I'm lucky to have some friends who hunt deer, and I am often given cuts of venison.  I had a couple of venison sausages in the freezer given to me by my friend, Paul, who also made the sauerkraut (thanks again, Paul - and while I'm at it, a huge thanks to Rick for the generous gifts of venison as well!).


A quick and easy lunch ... just brown one side of the sausage in a frying pan, turn over, toss in some onions, sweet peppers and sauerkraut, then add some beer or water to the pan - cook on medium-high for about 10 minutes.  When the liquid cooks away, continue cooking another minute or two to brown the sausage and onion/pepper/sauerkraut mix. Throw it all into a bun with some mustard, and there you go ...


Saturday, 30 March 2013

Lemon Cranberry Biscuity Scones?


I'm not really sure what these should be called - scone, biscuit?  Maybe it's just a fail, but how can a fail be so tasty?  I have been baking for enough years that I feel like I should know what I'm doing.  I often create my own recipes from scratch based on knowledge and previous experiences.  When I decided this morning to make scones, having only made them once before, I followed my usual process - check out a bunch of recipes on-line and select different parts that I like from each to create my own.  I suppose this was due to my inexperience with scones.

Although the result is moist, fluffy and awesomely delicious, I can't really call it a scone.  The texture just isn't right. Scones, from what I understand, should be more like a shortbread.  The dough is meant to be drier, something you can roll; this dough is more of a dry "batter".  I've seen references that scones are a form of quick bread, although I'm not sure that's the traditional definition.  This is definitely quick bread-ish.


Ingredients:
 2 1/2 cups flour
1/4 cup sugar
1 Tbsp baking powder
1/4 tsp baking soda
1/2 tsp salt
1 Tbsp lemon zest
1 cup cranberries
1/2 cup butter, cubed and chilled
1 egg
3/4 cup buttermilk
1 Tbsp lemon juice
1 tsp vanilla
Heavy cream


Method:
Mix first 6 ingredients in a mixing bowl.  Stir in the cranberries*.  Cut in the butter using a pastry cutter until small pebbles of butter are formed.


Beat the egg, then mix together all of the remaining liquid ingredients.  Pour into the dry, and stir together only enough to mix.  It's drier than a normal batter, so at this point, I actually put the dough on the counter, flattened it with my hand, and punched out rounds with a cookie cutter.  In hindsight, I wonder if I could have scooped up chunks and formed it into the shape I wanted (like making burger patties!).


 Brush with a bit of heavy cream, and bake at 350 degrees for 20-25 minutes.

* Note: I don't know if this is really necessary for scones, but when making raisin bread, coating the raisins with the dry ingredients help them to stay put during the baking rather than separate from the batter. 

Friday, 29 March 2013

Spanakopita with Tzatziki


Spanakopita Recipe

Make sure the frozen spinach is fully thawed and squeezed dry.  I prefer to use goat or sheep's milk feta, as I find the cow milk feta is usually a poorer quality and has a saltier brine.  So depending on the type of feta used, it is best to wait until it is mixed in before the final seasoning of salt and pepper.  The filling amount is just about right for a 454 gram package of phyllo pastry (I had just 2 Tbsp left over of the filling - if you have more than that left, it also works great as a filling for shell pasta with tomato sauce).


Saute the following in 1 Tbsp olive oil:
  • 3 french shallots, diced
  • 3 cloves garlic, minced
  • 2 large green onions, sliced (both white and green parts)

Add:
  • 500 gram package of frozen spinach
  • 1/3 cup of chopped parsley

Cook just until the parsley is wilted and the spinach is warmed through.  Remove from heat, then add:
  • 300 gram container of ricotta
  • 1 cup of feta, crumbled
  • 1 Tbsp lemon juice

Season with salt and pepper to taste.  Then mix in 1 beaten egg.


The Fold

Unwrap the phyllo pastry and keep a clean moist dish towel over top - phyllo pastry can dry out very quickly.  Melt about 1/2 cup butter (to start with, might need more).  Lay a single piece of the pastry on the counter.  Brush the left 2/3 portion with the butter (the pastry is very delicate, so even with a pastry brush, I still tend to just "dot" the butter here and there).  Fold the right third over the middle, then the left third over that to make a three layer sheet.


Lightly brush melted butter on the entire length. If you brush it on at this stage, you don't really need to add more as each fold will already have some butter on the pastry.  However, for extra flaky pastry, brush a bit of melted butter every two or three folds.

I like a high filling to pastry ratio, so I use about 2 Tbsp per pastry wrapper. The first fold is diagonally to the right to form the first triangle.


Then fold upwards, then diagonally to the left.


Again, fold upwards, then diagonally to the right.


Then one more upward, and if it worked out correctly, you'll have one last diagonal fold to the left to form your triangle.  If it didn't quite work out perfectly, just wrap up what's left and brush with melted butter one last time to hold the last fold together.


Bake on an ungreased baking sheet for 35-40 minutes at 350 degrees, or until the pastry is lightly browned.


 Tzatziki Recipe

I had just made a batch of yogurt that had a portion of the dairy from goat's milk, so this was particularly tasty with the spanakopita.  If you like a thicker yogurt, drain it in a coffee-filter lined colander over a bowl in the fridge for a few hours.  

Mix together the following:
  • 2 cups yogurt
  • 1 cup grated cucumber, seeds removed
  • 2 cloves garlic, minced
  • 2 tsp chopped fresh mint
  • 1/2 tsp salt

Let it rest for an hour or two for the flavours to develop.  Add more garlic or salt to taste.


Greenhouse Update - Lesson Learned

Hmm, apparently the temperature actually can drop that much over night!  After an afternoon temperature of 95 degrees F yesterday, this morning at 7am it was hovering just above the freezing mark.  My single test tomato was still fine, but the flower seeds certainly won't germinate in those conditions so I have brought them back in the house (hopefully they aren't already ruined).

Thursday, 28 March 2013

I'm In !!!! (The Greenhouse)

After at least two months of no access to the greenhouse due to the doors being iced over, I finally managed to force my way in today. Waaaaahhhhhhoooooooo!!  I have been wondering if I would be able to move some plants into the greenhouse soon, but was worried it might still be too cool as it is still going below zero during the evenings.  I don't think that's going to be an issue ... 95 degrees F!


I've decided to test it out overnight.  I'm not much of a flower person so I'm not too concerned if this test fails ... I have seeded three trays with flower seeds - nasturtiums, cosmos and marigolds - and hopefully they will germinate.  I have also put one of the stronger tomato plants out to see if it can stand the night time temperatures.  But seriously, at 95 during the day, how low could it possibly go at night?!


While I was out there, I cleared a spot for a raised garden of sorts.  Since the floor is gravel (and I haven't tried digging so not sure what options I have), I am going to use some short logs I've found outside to create a border for a small area where I can plant some veggies - the logs are about a foot high, so might work out for beets and carrots, and will definitely be deep enough for peppers, okra, maybe even some smaller tomato plants.


Not sure what's up with the little grey spider sitting on this caterpillar, but nice to see a caterpillar this early in the year (sorry, I know you can barely see the spider, but it really is there).


Growing Herbs From Seed ... Not

With the new house, I don't have any established perennials, and I'll want a lot.  In order to get lots of rosemary, thyme, tarragon and sage, I decided to try growing them from seeds.  Here is why I'll never do it again.

Here is the rosemary seedling that I started almost 7 weeks ago - out of 30 or so seeds, this was the only one that germinated. I have since started a few more, but it has been very challenging.  Out of a $3 pack of about 100 seeds, I have maybe 10 sprouts which I have been coddling day after day - heat mat, sometimes dark, sometimes under the fluorescent light - anything to get them to germinate and grow!!


And here is the rosemary plant that I just bought at a local grocery store for $2.


Need I say more?

Wednesday, 27 March 2013

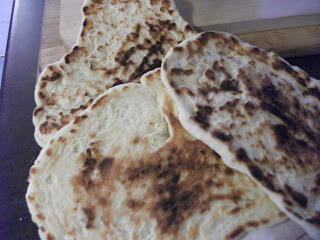
Mesir Wat (Spicy Lentil Stew) with Naan


That golden yellow Niter Kibbeh that I made a few days ago has been calling to me from the fridge - I'm big-time craving my favourite Ethiopian dish, Mesir Wat.  I make it risotto-style: adding the liquid portion of the recipe in increments until I have the texture that I'm looking for (creamy and more loose than thick).  I also find there is enough garlic and ginger flavour from the spiced butter used in the recipe, so I don't add any additional as some recipes do.  Regarding the berbere spice mix, I purchase it from an Ethiopian shop - Blue Nile Restaurant on Gladstone in Ottawa (best shop for purchasing ingredients but my favourite for the dishes is Horn of Africa on Rideau).  I've seen berbere recipes that include anywhere from 9 to 15 different spices depending on the source.  I like to make my own spice mixes most of the time, but I'm happy to leave this one to the experts.

If you want to make this dish but don't have Niter Kibbeh or berbere spices, you can certainly do so with some modifications, and there are plenty of recipes available elsewhere.

There are a couple of stores in Ottawa that sell Injera (Ethiopian bread), but neither is convenient for me, so I've cooked up a batch of naan instead. Get the naan going first so it has time to rise and can be cooked while starting the lentils.  The naan takes about an hour to rise, and about 5-6 minutes each piece to cook, and the lentils take about 45 minutes total - if you start the lentils once you start pan-frying the bread, you'll have the naan all cooked in time for the stew.

Naan Bread


Add a packet (approx. 2 tsp) of yeast into 1 cup lukewarm water; let sit a few minutes to activate (or just use quick rise instant yeast to avoid the hassle).

Beat one egg, then mix with 4 Tbsp white sugar and 2 tsp salt.  Stir into yeast/water mixture.

Add 3-4 cups flour (or more) and knead to form a typical bread dough.

Cover in a lightly oiled bowl and let rise in a suitable location for about 1 hour.

Pull off portions slightly larger than a golf ball; roll or stretch flat, no need to worry about shape too much!  Cook on medium heat in a dry pan, 2-3 minutes per side.  Lower the temperature if it starts getting too hot.


Tip:  The dough will puff up a bit during cooking, so best to test a small piece first to get a feel for how thin/thick you like your naan to be.  Recipe should make about 8-10 serving size pieces.


Mesir Wat

Warm up 1 1/2 litres of stock (veggie/chicken - your choice).  It usually takes around 5 to 5and a 1/2 cups.  If you run out before it's the right texture, just add some warm water.  It won't dilute the flavour at that point.

Saute 1 finely chopped shallot plus a pinch of salt in 2 Tbsp of Niter Kibbeh in a large pan on medium heat.

Add 1 cup of red lentils, stirring to mix with the butter.

Add 2 Tbsp berbere spice mix.  Stir and cook for a minute to ensure the lentils are evenly coated.

Start to add the stock slowly - 1/2 cup at a time; allow the liquid to be fully (or almost fully) absorbed before adding another 1/2 cup.  Stir once or twice to incorporate each liquid addition, but no need to constantly stir, it will take care of itself.  Add salt to taste.


 Serve with a dollop of raita, tzatiki or plain yogurt.  Garnish with cilanto or parsley.

Tuesday, 26 March 2013

Buttermilk Sourdough English-Style Muffins


While updating notes in my "gardening book" (I keep notes on when, what and how I'm planting so I can learn from my mistakes year to year), I noticed a recipe I had developed a couple of years ago for sourdough buttermilk bread - no idea why I wrote it in that book.  So here is the recipe, but I've just modified the technique to make these english muffins instead as I need to refresh my supply. 

If you have a good sourdough starter, you don't necessarily need to use the yeast in this recipe.  But for me, the sourdough is more about the flavour, and I prefer to remove the risk and just add in some yeast to be safe.

Mix:
3/4 cup room temperature sourdough starter
1 1/2 cups buttermilk (warmed in pan to lukewarm)
1/2 cup lukewarm tap water
1 Tbsp yeast

Let sit 5 minutes.

Stir in 3 cups bread flour (I already deviated from my recipe and used all-purpose here).  Cover and let sit overnight or at least a few hours.   This mixture is referred to as the sponge and is a technique often used in sourdough breads.


Add 1 1/2 cups flour (I used multigrain bread flour at this point but you can stick with regular bread flour) and 2 tsp salt.

Knead on floured surface, adding flour as required.   If you wanted to just make bread, here is where you'll just let it rise to double once, form into your loaf shapes, let rise again, then bake.


For english muffins, roll out the dough to about a 1/2 inch thickness.  Cut out rounds using a 3.5" biscuit cutter (I couldn't find one so used a Guinness glass which made them a bit smaller than commercial english muffins).


Cover with towel or pop into oven on proof setting and let rise about 45 minutes.


Tip:  If you move them to a pan for the rising, sprinkle the pan with a bit of cornmeal to keep from sticking.

Fry in a covered pan at a low temperature for about 5-7 minutes each side.  The pan can either be dry or have a small amount of butter.


The nooks and crannies in the "crumb" occur naturally, but are enhanced if you use a fork to split the muffin apart.


Monday, 25 March 2013

An Eternity of Winter

Yeah, that's right, I don't love winter, and this one seems like it's lasting an eternity!  I moved to Eastern Ontario from Vancouver 14 years ago.  I really thought I had finally acclimatized over the last couple of years, but this winter is seriously dragging.  The daytime highs have only just started to stay above freezing, but the majority of time is still below zero and this snow isn't going anywhere soon.

Some pics from around the property in the past few days:

Birch trees bowed over, tips stuck in snow


These cattails give me an idea of how wet my property is


Wild turkey tracks


Pine trees in the back few acres, formerly part of a Ministry managed forest project

Sunday, 24 March 2013

Plant Update - March 24th

I was running out of space, again, so while at Lowe's yesterday purchasing a few tools and gardening supplies, I saw this 4-tiered "mini greenhouse" unit.  It fits perfectly in the solarium area, and the 4 shelves provide far more space than I had previously available.  After only an hour in the window this afternoon the temperature was very high inside, so best to keep it unzipped during the daytime!


This allowed me to move a few more seedlings upstairs that were ready for direct sunlight.  I kind of plopped the little pot of parsley as is into a bigger pot, so it's kind of bunched up in the middle.  But it will spread out a bit as it becomes accustomed to the larger space.


The sage is still tiny, but looking sturdy.  So much better than the miniscule rosemary and thyme that were started at the same time!
 

Tomatoes are awesome - some as tall as 6 inches!  These are the San Marzano plums.


I had more space in the basement "seedling germination area" now to start more plants.

Saturday, 23 March 2013

Ethiopian Spiced Clarified Butter (Niter Kibbeh)


 This spiced butter is the starting point for a number of Ethiopian dishes, but can be used in many other ways: add a dollop on rice, potatoes or veggies (Mmm so good with squash), cooking eggs or even tossed with popcorn!  It's a bit time consuming but it makes a lot and will last a long time (I've heard it can last months in the cupboard, but I keep mine in the fridge - the last batch kept for 6 months!).


Ingredients
1 pound unsalted butter, cubed
2 minced shallots (about 1/4 cup)
1 large garlic clove (or 3 small)
2 Tbsp minced fresh ginger
15 cardamom pods (crushed)
3 whole cloves
1 4-inch cinnamon stick
1 Tbsp dried oregano
1/2 tsp ground turmeric
pinch of fennel seed


 Toast the cardamom, cloves and cinnamon over medium heat in a dry heavy pot for one to two minutes, until fragrant.


Add all remaining ingredients.  Reduce to low heat and let come to a very slow simmer.  It should take 45-60 minutes for the milk solids to fully sink to the bottom, leaving a translucent golden liquid - that's your clarified butter!  During the cooking process, even at low heat, don't feel you can walk away.  You do not want to let the milk solids at the bottom get too hot or they will burn and it will be ruined.  You will also need to skim off some of the foam that will rise to the top (the foam is the water content in the butter cooking away).  I tend to use more cardamom pods than some recipes as the cardamom will rise to the top of the liquids and sometimes get removed along with the foam.


Aside from removing the foam, don't stir or you'll disturb the milk solids and it will just take longer to settle.  Once you see the translucent liquid, remove from the heat.  Using cheesecloth or a strainer, pour into a glass jar.   Discard spices and milk solids.  Store niter kibbeh in fridge.