

Wednesday, 29 April 2015
Tuesday, 28 April 2015
Spring Flowers ... Finally!
Well, I guess the daffs have been out for a week or so, but nice to see a few others ...


Sunday, 26 April 2015
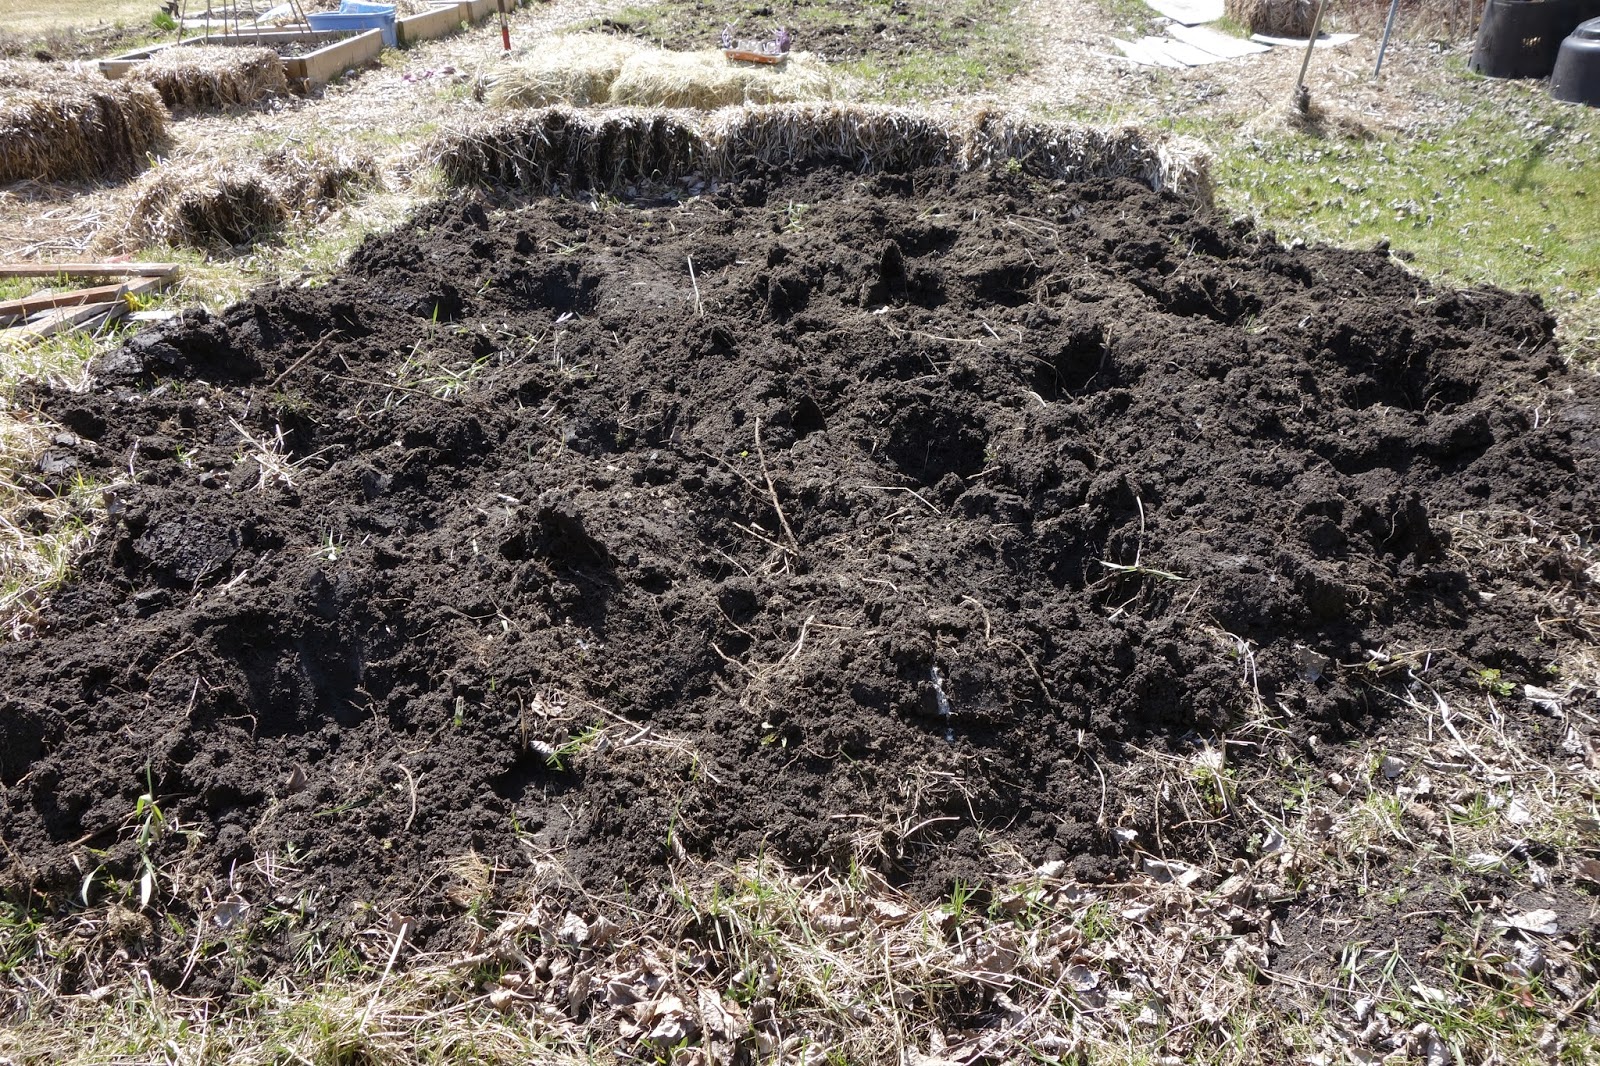
The New Compost

Composting at my place has mostly been limited to food scraps and grass clippings as that is all that could fit into the black composter that I have here (same kind I've had everywhere).

Garden waste such as dead tomato plants after harvesting or other yard waste such as smaller branches and such have generally been tossed into the nearby bushes. My efforts last summer to clean up the front flower gardens and trim back all the trees resulted in this pile (below) which admittedly is half on my neighbours property (with several acres in between us, I don't think they'll notice). It has mostly decomposed but it's a bit unsightly.

I have wanted a larger compost area for a while. I have been collecting old pallet skids whenever I could find them for this purpose. But the perfect back piece arrived with my greenhouse - it was the 10 foot long skid that the greenhouse pieces were shipped on. The smaller skids were screwed into the ends and middle of the larger back piece and a few stakes have been placed in the ground to solidify it a bit.

I will likely nail a board in along the front just to "hold things in". Otherwise, I've left it wide open for now. I'll see if it becomes a problem with pests but I don't expect it to be any worse than my current spot.

I've been composting just a few feet away with no lid. Well, I had one lid but used the two halves as separate composters so only the smaller one had the lid. I must have put the lid on with something inside as it managed to chew its way out. Hmm. But it's mostly just mice, voles, chipmunks and such.

Saturday, 25 April 2015
Cucurbits Started and New Label Markers

I never seem to have enough time to get fully grown pumpkins so I like to get seeds started indoors. I would have started them last week but I've been away from home and already had a lot for my housesitter to look after.
I generally direct sow seeds for summer or winter squash but based on last year's poor results, I've decided to start them indoors as well.
The following are now under the lights:
- Watermelon: 10 seeds of Moonbeam; 10 seeds of Sugar Baby
- Pumpkins: 10 seeds Sugar Baby; 10 seeds of a Rainbow Blend variety pack
- Winter Squash: 6 seeds each of Sweet Dumpling, Waltham Butternut, Table Queen Acorn
- Summer Squash: 10 seeds various; 6 seeds Zapolitto del Trunco
- Melons: 10 seeds Hales Best; 10 seeds Mouse Melon
- Cukes: 12 seeds Marketmore

I've done a really good job this year with tracking the dates when I have started seeds. As I was entering the dates for today's batch, I realized I had missed planting seeds for Red Kuri squash. I'll try to find that seed packet and get those in later today.
But I am still having a lot of problems labeling the seedlings - in fact, I'm already a bit mixed up with my peppers (not sure which is which for a few of them). I've tried plastic labels that you write on; unfortunately, the writing keeps fading, especially in the greenhouse.
I really need to keep track of these as I'm likely going to share some winter squash seedlings with friends. So I'm trying this new style where you just stick a piece of paper (or the seedling packet itself if empty) into a tube. They are much pricier but can obviously be reused. Once I've got the cucurbits in the ground (or given away to friends) I'll use these label markers for other crops like carrots.

Sunday, 19 April 2015
Tests in the Garden
I'm off on a work trip for a week so won't have any updates for a while. So here's a brief update of what has happened recently and some new things I'm trying this year.
I've decided to test the "plant when soil can be worked" concept. I don't normally plant this early but it seems like everyone else does? But I'm also testing plants in this particular space for another reason ... this area doesn't get as much sun as my other garden spaces. I tried to do a "3 sisters" garden here last year but it didn't go very well. Yesterday I threw in some seeds for an Italian lettuce blend plus Ruby Red swiss chard. Both are cool season plants so should be OK with a light frost and less sunlight. This might also be a good spot for brassicas.

With the same test of "plant when soil can be worked", I've done a second planting of the seeds I put into the greenhouse recently but in an outdoor spot that gets a lot of sunlight ... Kindle lettuce, Nero di Toscana kale, Easter Egg Radish and Red Baron bunching onions. I've also added one new green ... Bloomsdale spinach (my first time growing this). I've added some string to cat-proof the area until the plants start popping up.

I did not cat-proof another space where I've planted Astro arugula so we'll see how it goes! But that is another test ... in addition to planting earlier than I normally would, I also mixed the arugula seeds with mycorrhizal fungi before planting. This is my first year using this fungi (inspired by Michelle's amazing production!). I've read a lot about this and watched a lot of youtube videos to see how other gardeners use it. Mostly it will be used to help with tomatoes and peppers, but I thought I'd try it on a few other plants (I also scattered some around the "3 sisters" garden before planting the lettuce and chard).
And just a couple of updates with no tests involved ... I planted the potatoes: 6 yukon gold, 12 fingerlings and 8 russian blue. I generally just plant the seed potatoes in the bottom of a hole and slowly pile up the soil as the plant grows.
And I've got some sugar snap peas started. I had intended for the peas to go in another area, but I'm a bit behind on prepping some of the garden spaces, so adjusting as I go!

I've decided to test the "plant when soil can be worked" concept. I don't normally plant this early but it seems like everyone else does? But I'm also testing plants in this particular space for another reason ... this area doesn't get as much sun as my other garden spaces. I tried to do a "3 sisters" garden here last year but it didn't go very well. Yesterday I threw in some seeds for an Italian lettuce blend plus Ruby Red swiss chard. Both are cool season plants so should be OK with a light frost and less sunlight. This might also be a good spot for brassicas.
With the same test of "plant when soil can be worked", I've done a second planting of the seeds I put into the greenhouse recently but in an outdoor spot that gets a lot of sunlight ... Kindle lettuce, Nero di Toscana kale, Easter Egg Radish and Red Baron bunching onions. I've also added one new green ... Bloomsdale spinach (my first time growing this). I've added some string to cat-proof the area until the plants start popping up.
I did not cat-proof another space where I've planted Astro arugula so we'll see how it goes! But that is another test ... in addition to planting earlier than I normally would, I also mixed the arugula seeds with mycorrhizal fungi before planting. This is my first year using this fungi (inspired by Michelle's amazing production!). I've read a lot about this and watched a lot of youtube videos to see how other gardeners use it. Mostly it will be used to help with tomatoes and peppers, but I thought I'd try it on a few other plants (I also scattered some around the "3 sisters" garden before planting the lettuce and chard).
And just a couple of updates with no tests involved ... I planted the potatoes: 6 yukon gold, 12 fingerlings and 8 russian blue. I generally just plant the seed potatoes in the bottom of a hole and slowly pile up the soil as the plant grows.
And I've got some sugar snap peas started. I had intended for the peas to go in another area, but I'm a bit behind on prepping some of the garden spaces, so adjusting as I go!
Saturday, 18 April 2015
Starting Flowers from Seed

Earlier this week, I started a bunch of flowers in flats in the greenhouse. Most of them are flowers that are beneficial to a vegetable garden: sunflowers, marigolds, nasturtiums. And I also started some cosmos, just because I think they are pretty. Unfortunately, I neglected to get more cosmos seeds, and had very few left. I can't be bothered to buy more now, so I'll have to make do with what I have.

I started 3 different types of marigolds. If you don't grow marigolds from seed yourself, you might be surprised by what the seeds look like. Not very seed-like ... they kind of look like toothpicks.
 |
| My hand looks really weird? |
But they grow fast ... here they are after 6 days.

And for contrast, here are nasturtium seeds. Because they are so large, it takes extra time to break down the "shell", so there are no signs of them yet. But it shouldn't be much longer. Nasturtiums grow quite quickly.

I also started some "Kong" sunflowers. I've grown them in previous years and they never quite get to the 14 foot description - more like 9-10 feet so still pretty cool. As usual, I started them too soon. They grow quickly (again, this is 6 days):

I'll usually buy some pansies or petunias - I've never tried them from seed before but they are pretty cheap to buy locally. In the meantime, I've got a few perennial flowers popping up around the yard (grape hyacinth, two pics of daffodils, crocus).


Wednesday, 15 April 2015


Saturday, 11 April 2015
Finally Some Time Outside

So far, all of my gardening activities have taken place indoors getting seedlings started. The weather hasn't been very cooperative until this weekend. But today I'm still wearing a bulky coat and I look forward to the promise of warmer weather starting tomorrow.
As you can see in the picture above, the main garden area (which has the most sun exposure) is free of snow. But not so much the rest of my yard. I had a similar problem as Margaret recently described ... my much needed bag of peat moss was frozen where I had left it last fall!

Luckily a half-filled bag was partially thawed - the snow was an advantage in dragging it closer to where I needed it.

I mixed up a small wheelbarrow full of potting mix - I'm not much for measuring but it's made up of sheep manure (another bag left in the fall that was partially frozen), peat moss and vermiculite. I'll use this to start marigolds, nasturtiums and sunflowers to help in the veggie garden plus some cosmos just because I like them.

Elsewhere in the yard ... the straw bales from last year still seem to be in good enough shape that I can use them for planting. The squash plants that I planted in them did not grow at all. I'm not sure if it was due to the straw or just the poor weather. Either way, I'll give them another try this year.

But just in case the straw was the cause of the poor growth, I've also got some new hay bales this year - timothy hay - which should have more nutrition than the straw.

And I laid down some landscaping fabric in the fall (beside the garden used for potatoes last year) which was held down by two pallet shelves from the old greenhouse - I was thinking of using these to hold containers of veggies this season and I'll dig a new garden here in the fall.

But we'll see how that idea goes .. I have a ton of things I need to get done! I won't bother to embarrass myself by posting a list as I'm pretty sure I won't get it completed. But I think this would be a good time to shut down the computer and get back outside.
Monday, 6 April 2015
Planting the Greenhouse Garden Bed

Despite forecasted low temperatures of -5 Celsius in the next week or so, I've decided to get some seeds started in the greenhouse. It is plenty hot during the day, but overnight it still seems to drop close to outdoor temperatures. So I started with cool weather crops.

I've planted the following seeds east to west (top to bottom per the photo) in the greenhouse bed, putting low growth crops under the upper shelves and taller crops between the shelves:
Lettuce (Kindle): Butterhead variety. This is the first time I've used (or even seen) a pelleted lettuce seed. I'll need to keep it plenty moist in the first few days until the coating cracks open.
Bunching Onions (Red Baron): These seeds are left over from last year. Intended as spring onions, but will grow quite large if left long enough.
Radish (Easter Egg Mix): William Dam Seeds mix of coloured radishes. I haven't grown radishes in a couple of years so looking forward to these.
Kale (Nero Di Toscana): Black Kale, same seeds from last year.
Borage: In the order I've planted, this is meant to be one of the "low" crops. Borage are very large herb plants, so these are only here until they grow large enough to transplant outside (OK this isn't really a cool-weather crop, I just thought I'd give it a try).
Tsoi Sim: First time even growing these asian greens. I will also be starting some outside when the temperatures warm up.
In fact, I'll be planting all of these outside as well as in the greenhouse - this is just a head start on some of them!
Sunday, 5 April 2015

Saturday, 4 April 2015
Signs of Spring ...
Mike from Mike's Bean Patch recently shared his thoughts on what signals the arrival of spring. I was thinking about this yesterday as I wandered around the yard on the 2nd consecutive day of double-digit weather (15 Celsius!).
I had two immediate thoughts of what spring means to me ... the first spring flowers and the return of the robins. Earlier this morning, I lost power for about 4 hours from the strong winds; the strong winds that also brought another inch or two of snow.
But the daffodils are still standing.

And the robins are still hanging about (or at least this one is).

Does everyone have robins - I assume they are common in most areas of North America? I had the pleasure of watching some baby robins a couple of years ago; they had set up home on top of my much needed pots so I was anxiously awaiting the hatching!
The garden was free of snow yesterday (sigh, not so much now). I even noticed the chives already starting to pop up - I wish I'd taken a picture - they are just a memory now :).

Thursday, 2 April 2015
Greenhouse - Interior Layout

My plan has always been to crowd as much as I could into it. I didn't spend the money so I could have a cutesy little place to relax and maybe read a book on cold days (I can't remember what I google'd to find this image below, but wow). Not that it's a bad idea ...I just have better things to do with my limited cash!

So I read a lot of books and searched the internet for the best approach to designing the interior space of a small greenhouse. The main point, naturally, related to getting the best benefit from sunlight ... that is, after all, the main point of having a greenhouse.

The greenhouse was built so that the length was east-west. It is also built on the northern end of my property. This allows it to have the most exposure of sunlight during the day. The tallest structure in the greenhouse should be in the northwest corner - this will avoid or reduce the casting of shadows on the rest of the interior.

To ensure the greatest benefit from sun, the highest shelving is on the north side and the lowest on the south. The shelving itself was quite a source of anxiety over the winter. My first choice, cedar garden benches, are definitely out of my price range. Maybe if I was handier I could put something together myself but I'm not so handy (to mangle a Red Green quote*, "if you aren't handy, you'd better be handsome"). I had originally thought of buying shelves designed for greenhouses. I then realized they looked just like the resin shelving I had in the basement for storage. So I bought a bunch of adjustable resin shelving units and made my own version of garden benches - I paid about $160 for 4 units that became my interior benches (I'm guessing a quarter of the cost had I ordered the benches in the earlier link).
On the southern side of the greenhouse, I will have a garden bed. The frame of the bed is actually one of the shipping crates that the polycarbonate panels were shipped in.

On top of the bed, I will also keep some low shelving staggered across the bed. I'll manage the plantings so that low crops (radish, lettuce) are directly under the shelves while taller crops are in between. I had laid down patio stones in the fall but didn't want them under the bed so had to shuffle things around a bit (hence all of the stones lying around in most of these pictures).

In the northwest corner will be a tall shelving unit that will likely be mostly storage for tools, gloves, etc. But I won't waste space so will shove some plants in wherever they fit. Then from west to east, the shelving gets lower at intervals.

I haven't really figured out the rest ... the great thing about using the adjustable resin shelves is, well ... they're adjustable! So we'll see what happens over the coming months and I'll change things to meet my needs.
I am very much looking forward to a full greenhouse by mid-summer!
___________________________________________________________________________
*For anyone who hasn't watched The Red Green Show, the actual quote is: "If the women don't find you handsome, they should at least find you handy".
Subscribe to:
Posts (Atom)