Friday 31 May 2013

First of Many (May 31)


I have already had the pleasure of eating my first strawberry from the garden (might have picked it a bit early, it looked good but not so the taste), and a sugar snap pea from the container planting in the greenhouse (oh, so fresh and tasty!).  And a number of firsts have also occurred over the past week.
 
The first potato flowers!


The first hot pepper!  I did a poor job keeping track of my plants after the first transplant. 

I am pretty sure these are not jalapenos, yet all of my other Hungarian Hot Wax have yellow flowers, and this plant clearly has white flowers. 

I'll have to keep an eye on this one.


The first sugar pumpkin - this little guy has been growing for a week or so now.  I have not had the opportunity to pollinate as the male and female flowers never seem to be open at the same time!  I'm still hoping for lots of bees coming into the greenhouse, but haven't seen many anywhere recently. 

I am also wondering if the flower is too dried up, and maybe this will affect the pumpkin from ever growing?  I'm still learning about pollination ... luckily, most of my pumpkins are outside and I should not have to worry so much about it.


 And as I reported my first tomato a few days ago, this isn't a true first, but it is the first black krim.


Thursday 30 May 2013

Ginger Rhubarb Jam

The rhubarb was green and I refuse to add food colouring!

Why is it that I always hear people complain about having too much rhubarb, but I can't find anyone offering any when I want some? For many years, I have always had plenty ... for making great dishes, but also for experimenting.  Since I am in a new location this year, I have just planted rhubarb and need to let it grow, produce and feed itself for the coming years so I cannot harvest any of my own this year (as if there is any use for the few spindly stalks available anyway).


Needless to say, I've been forced to purchase rhubarb at a local farmer's market!  It becomes expensive to experiment, and I've already been disappointed by a recipe that was supposed to produce a "super tasting rhubarb treat" - most of it ended up in the garbage.  So my latest purchase this past weekend was used more wisely - a stewed ginger rhubarb jam.  I have made many jars of something similar in the past.  I don't have enough now to make the effort of bringing out the canning equipment, so I'm just keeping it in the fridge, but I will happily make many jars next year when I have access to free rhubarb in my own yard!

The rhubarb I purchased at the farmer's market was pretty green ... sometimes this is a result of the variety, sometimes a timing of the particular harvest.  I refuse to add food colouring to my food, so maybe it doesn't look as pretty as some.  But it's delicious!  And very gingery.


Ginger Rhubarb Jam

An important point to note is the size of the rhubarb chunks ... I used 10 cups in the recipe, but the rhubarb pieces were cut quite large - about 1.5" x 1".  When piled into a measuring cup, there are a lot of space gaps, so a smaller cut would take a smaller measurement.  I wish I had weighed the rhubarb, but too late now!
 

Candied Ginger
 In a large pot, add:

10 cups chopped rhubarb (large pieces as noted above)
3 cups sugar
1/4 cup candied ginger, diced
lemon zest (two lemons)
2 Tbsp lemon juice
2 inches of fresh ginger root, grated


Let stand for a half hour for the sugar to dissolve. Then cook over medium-high heat until thick - about a half hour but it can really depend on the water content in the rhubarb.   You want it to thicken, but keep in mind that it will continue to thicken a bit as it cools.  Pour into clean jars and refrigerate (or process with an appropriate canning method). This recipe made a little over 1 litre.

And I don't know how much difference this made in the "setting" of the jam, but I know that lemon rinds and seeds contain natural pectin.  So after zesting and juicing the lemons, I wrapped the rinds and seeds in cheesecloth and let it float amongst the fruit as it stewed.  I always use organic lemons when using them for zest as they do not have the usual wax-coating, so with a quick wash, they are perfectly fine for this purpose.

Wednesday 29 May 2013

Plum Trees


During a recent shopping spree at various plant sales, I was told of a sale on fruit trees at the local Crappy Tire (much cheaper than the price at most nurseries).  I have two crabapple trees and a Haralson apple tree in the yard - at least according to visitors who seem to know trees as I'm new to this property and haven't seen any production as yet.  But I don't have plums, and I've always wanted plum trees.  So as I often do, I boogied on down to the store and picked up a couple of plum trees.

The picture on the trees labelled "Satsuma" looked a lot like the kind I grew up eating, so I bought two trees.  I knew that plums needed cross-pollination so two trees would be required.  After I got home, I googled plums to see what's what about planting, etc.  Well, no surprise to anyone who knows me, but I didn't quite get the facts right!  Cross-pollination apparently means pollination from a different type of plum - in the case of Satsuma's, the best option was Santa Rosa.  Luckily, they were also selling Santa Rosa's, so I now have three plum trees (yes, I could have exchanged one of the Satsuma's but I have problems returning things!).

I just found another website that indicates Satsuma are partially self-pollinating but are helped along by Santa Rosa.  Argghh!  Fruit is very new to me ... I have planted blueberry and raspberry bushes as well, but not sure how it all works (which is why I planted two raspberry bushes only to discover that I already had raspberries growing in the garden).


What I don't understand is why there is only the one apple tree?  It's small, so obviously only a few years old ... but does it not require a second tree for pollination?


Tuesday 28 May 2013

Leek and Boursin Casserole


The days have still been cool enough to enjoy a good casserole.  I had a similar dish to this many years ago made with three onions and three cheeses but I can't remember which kinds.   When I saw some nice looking leeks in the store recently, I decided to give this a try.  This dish contains two of each (onions and cheese), but the predominant flavours are definitely the leek and Boursin, hence the name of the recipe.


Leeks have dirt or sand in between the layers, so it's best to give them a good wash.  If they are going to be sliced as in this recipe, just soak the slices in some water before final use; it is much more effective than trying to remove the sand while still whole.


Ingredients:
3 large leeks
2 shallots
Aged cheese such as aged cheddar, gruyere or parmesan
1/3 cup Boursin Cheese - pepper or herb flavour
1/2 cup white wine

Slice three large leeks, soak in water, then drain.  Slice 2 shallots.  Toss shallots and leeks together.  Butter a small casserole dish.


Place half of the onion mix in the dish. 


Layer with grated parmesan or sliced aged cheddar (I used 3-year old Balderson Cheddar).  Sprinkle with freshly ground pepper and salt.

Place the remaining half of the onion mixture on top.


Top with 1/3 cup Boursin Cheese.  Add more freshly ground pepper and salt to taste.

Pour white wine over the mixture. 


Bake at 350 degrees F for approximately 60 minutes.  Top should be browned and onions will be creamy!


Sunday 26 May 2013

Plant Update - May 26


The past week has been cool and wet ... I actually covered the plants two nights ago fearing frost.  But all is well, and the lows for the next few days are a few degrees above freezing.  Whew!!  But there have been heavy rains, and parts of the yard have flooded again, unfortunately.  So far, the outside veggies seem OK, but I may have lost some flowers that were planted from seed just before the rains hit.

The potatoes planted outside a few weeks ago look good albeit a bit soggy; but the fingerlings (my favourite potato!) were put in the ground just a few days before the rain hit and I'm not sure if they will be too waterlogged at this point.  And the container potatoes in the greenhouse are looking awesome - on the verge of flowering.


I have had some challenging times with onions this year. I spent months babying the onions grown from seed in the house, but I think the location in the basement was too cool and those few that germinated did not grow well. So after much effort, I ended up having to buy onion seedlings (in the garden just today).  Not sure what I'll do next year. I like to grow from seed for the different varieties, but this year was certainly a lot of work for nothing.


Both the bush cucumbers and the one sugar pumpkin I have in the greenhouse are already flowering.  I have considered pollinating the pumpkin "manually", but the male and female flowers never seem to be open at the same time.  It's still early in the season, so I'm hoping that won't be an issue.


But I am slightly concerned about the pumpkin patch outside.  They weathered previous frosts as I had them in the ground quite early this year.  But I do hope the rains have stopped for a few days as the area around the patch is far too wet and needs to dry up soon!


The most exciting developments are the peas which are now flowering, and a tomato!!  The tomato happens to be on a plant that has been set aside for a friend, but there are plenty of flowering plants otherwise.


Saturday 25 May 2013

Asparagus with Miso Butter and Poached Egg (Momofuku)


I hit a farmer's market earlier today for another batch of asparagus. My own asparagus crowns, planted only a few weeks ago, are barely showing any growth let alone enough to eat!

I would call this a "lazy version" of the original Momofuku recipe, but the original version isn't exactly complicated.  I've simply blanched the asparagus rather than pan-grilling it as called for in the recipe, and my miso butter is just blended in a bowl and slightly warmed rather than prepared in a pan (oh, and I left out the sherry vinegar as I had none on hand).
 
Recipe:

Mix equal amounts of white miso paste and unsalted butter - I used one Tbsp of each for two healthy servings.

Cook asparagus (boiled until just cooked; dumped in ice water to stop the cooking).


Poach eggs:  Add 1 Tbsp white vinegar to shallow pan of water.  Slowly add eggs, cook at a slow simmer until whites are cooked through and yolks are still runny (about 3 minutes).


Spread some miso-butter on the plate, add the asparagus, then a poached egg on top.  Season with cracked black pepper.  No salt needed (unless you're a fiend) ... miso is salty enough.


Friday 24 May 2013

Apple Cinnamon Bread Pudding with Lemon Custard Sauce


I still had some leftover cinnamon bread (brioche style loaf) and it was just old enough to be perfect for making a bread pudding (or yummy french toast).  This recipe is still moist after baking, but I added the lemon custard sauce for an extra treat.


Caramelized Apples:
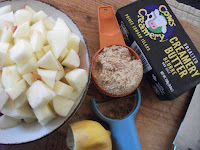
2 1/2 Tbsp unsalted butter
3 apples, cut into chunks
1/4 cup brown sugar

Melt butter in pan; add sugar and apple chunks.  Cook on medium heat, stirring occasionally, until apples are a golden brown colour.


Bread Base:
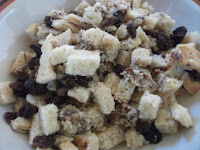
4 cups cinnamon bread, cut into chunks
1/4 cup raisins

Combine in bowl.  Stir in caramelized apples.


Pudding Custard:
1 cup cream
1 1/2 cups milk
3 eggs
1 Tbsp lemon zest
1/2 cup white sugar
splash vanilla

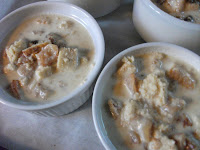
Combine all ingredients, pour over bread and fruit.  Let mixture stand 45 minutes.  Ladle into individual buttered 4" ramekins.


Place on a tray with high sides, and pour hot water about halfway up the sides of the ramekins.  Bake for 30-40 minutes at 350 degrees F or until knife inserted in centre comes out clean.

While baking, prepare lemon custard sauce.


Lemon Custard Sauce:
2 large yolks
3 Tbsp white sugar
1 cup 10% cream (half and half)
1 1/2 cups milk
2 Tbsp lemon zest
1/2 tsp lemon juice
1/4 tsp vanilla

Mix yolks and sugar in a soup-size bowl.  Mix cream, milk and lemon zest in a pot over medium heat (or double boiler) and allow to scald.  Pour some of the hot mixture into the egg/sugar bowl, whisking quickly to avoid cooking the eggs.  Pour the heated egg mixture into the pot with the cream, place back on stove top. Cook, stirring frequently, until thickened.  Remove from heat, add vanilla and lemon juice.  Serve over the warm bread pudding.  Garnish with berries.


Thursday 23 May 2013

Happy Day Sign

I expect to have a happy day ... I saw this at the end of my driveway!


Tuesday 21 May 2013

Goat's Cheese and Chive Biscuits


There is quite a longstanding debate over what is a scone versus a biscuit.  There are a variety of thoughts, many related to ingredients (scones use a heavier cream rather than the lighter buttermilk often found in biscuits), or the serving approach (scones are served with tea, biscuits with gravy).  My preferred position on the subject was that of an ex-pat American living in Scotland who suggested they are one and the same. Another argument that I am prepared to accept is simply savoury versus sweet.  But there are many restaurants that offer Goat's Cheese and Chive Scones. So maybe it's just a hoity-toity thing ... scone definitely sounds fancier than biscuit.  I don't care too much either way, so long as it tastes good!


Ingredients:
2 cups flour
2 tsp baking powder
1/2 tsp baking soda
1/2 tsp salt
1/2 tsp pepper
90 g butter, chilled
1/3 cup heavy cream
1/3 cup milk
2 Tbsp chopped chives
2 oz goat cheese chevre, crumbled
2.5 oz goat cheese feta, crumbled


Mix flour, baking powder, baking soda, salt and pepper in a bowl.  Cut the butter into chunks and blend in, using fingers or pastry cutter, until pea-size balls form.  Make a well and add in cream, milk, chives and both cheeses.  Stir lightly with a fork until mixture begins to come together.  Don't work the dough too much or it will toughen the end result.  The dough might still seem a bit dry at this point.


Place on lightly floured surface and knead just enough to form a ball.  Pat (or roll - I prefer to use my hands) down to about 1 to 1.5 inch thickness.  If you want to cut them into triangles, form a circle, then cut into slices. 


Otherwise, if using a round biscuit cutter as I used, the shape doesn't really matter.  Stamp out circles and place on a parchment-lined tray.  Put in fridge for about 20-30 minutes.  Set oven to 375 degrees F.  Just before baking, brush tops with heavy cream.  Bake 15 minutes or until golden brown.


Monday 20 May 2013

Yard Update - May 20: ID'ing plants, trees


I had some visitors this weekend, three of whom knew plenty about trees, flowers and such.  Between them, I was able to confidently identify some trees and plants that I had previously only guessed at.  I'm thrilled to find out that I have crab apple trees, two varieties.  


I know they can be messy, and will likely attract wildlife for nibbles, but I'm excited to try crab apple butter again.  The one time I tried making it I overcooked it, and rather than apple butter, it was more like fruit leather.  It was tasty, but I didn't realize how thick it was, so instead of spreading it on sheets like regular fruit leather, I stored it in jars - kinda hard to dig out, so much of it was chucked uneaten.  The flowering crab apple tree smells fabulous and is filled with bees today!


Hardy Geraniums - in pot and in garden


During this long weekend in May, I also visited some plant sales.  One woman in a neighbouring area was especially helpful, and I purchased a number of plants.  After visits from friends, I realized that half the plants I purchased were already existing in my yard!


Lily of the Valley - in pot and in garden


Ugh ... hopefully I'll get this whole flower thing worked out soon so I don't keep embarrassing myself like this.  But it was worth the time I spent talking to the vendor, understanding which plants are good in shade, sun, etc. (and I saw the proof, as we walked around her yard where she pointed out each plant!).


Purchased two varieties
I have been anxious about getting some daylilies as they are so pretty; I had even considered ordering some online.  I could not believe how pricey they were!  So when I found some locally this weekend, I grabbed what I could - $5 per plant (a steal, compared to online prices).  Argghhh ... it turns out that I already have 3 patches; two of them very large.  I had no idea what these were, I was thinking rhododendron, which is silly because I don't even know what rhododendrons look like (nothing like daylilies as it turns out).


One of three daylily patches in the yard


Raspberry bush in the garden
And since my recently planted raspberry canes are still strugging along, how great to be told that I already have several raspberry bushes!  Odd location in the garden (at least, it seems odd to me) near the strawberries.  I prefer them on the outskirts, so will see if a transplant is possible some other time.  The raspberry canes I planted a few weeks back are not going to bear fruit anytime soon, so I'll take what I can get!


 And lilacs - both lilac and white!


 And a purple-leaf sandcherry (in need of pruning).


And a brief robin update ... not sure how many are left ... there are two in the nest that I can see, but I suspect one is the same I saw later in flight (and shown below on a ledge). I can't wait for them to be on their way so I can stop tip-toeing around the area!